
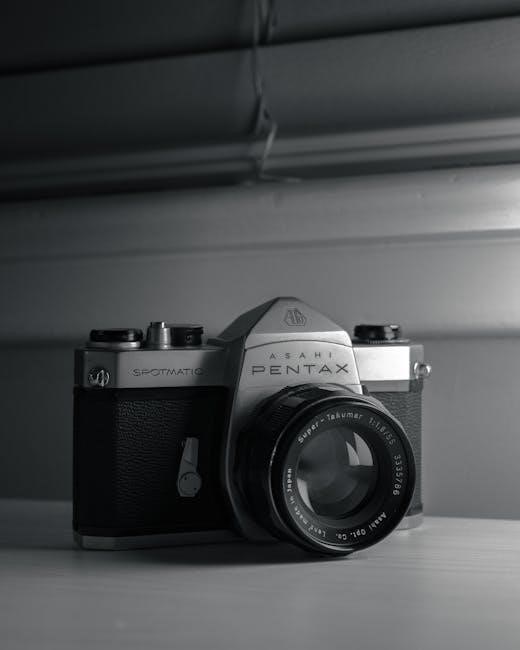
The Pentax ME Super is a classic 35mm SLR camera known for its compact design, ease of use, and compatibility with a wide range of lenses.
- It features automatic and manual modes, making it ideal for both beginners and experienced photographers.
- The camera is built with durable materials and offers intuitive controls for precise photography.
1.1 Overview of the Camera and Its Features
The Pentax ME Super is a 35mm SLR camera designed for versatility and ease of use. It features automatic and manual shooting modes, allowing photographers to choose between convenience and creative control. The camera is compatible with SMC Pentax lenses, offering high optical quality. Key features include a built-in flash, electronic shutter, and aperture-priority auto mode. Its compact design and intuitive controls make it a favorite among both hobbyists and professionals. The ME Super also supports external flash units and provides precise metering options for optimal results.
1.2 Importance of Reading the Instruction Manual
Reading the Pentax ME Super instruction manual is essential for understanding its features and functions. It provides detailed guidance on battery installation, shooting modes, and maintenance; The manual ensures safe operation and helps photographers maximize the camera’s potential. It also offers troubleshooting tips and explains how to use accessories effectively, making it a vital resource for both beginners and experienced users to get the most out of their camera.

Key Components of the Pentax ME Super
The Pentax ME Super features a durable design, aperture-priority auto mode, and manual override. Key components include the lens mount, shutter dial, and battery compartment.
- SMC Pentax lenses ensure optical excellence.
- The camera’s compact size enhances portability.
2.1 External Controls and Their Functions
The Pentax ME Super features intuitive external controls designed for easy operation. The shutter speed dial sets exposure time, while the aperture ring adjusts lens opening. A mode switch toggles between auto and manual modes. The film advance lever moves to the next frame, and the rewind knob releases the film. A battery check button ensures power status verification. These controls provide precise control over camera settings, enhancing photography flexibility and creativity.
- Shutter dial: Adjusts exposure time from 1/1000 to 8 seconds.
- Aperture ring: Controls lens aperture for depth of field.
- Mode switch: Selects auto or manual operation.
2.2 Internal Mechanisms and Their Roles
The Pentax ME Super’s internal mechanisms ensure smooth operation and precise photography. The shutter mechanism controls exposure duration, while the mirror system minimizes vibration and ensures accurate framing. The light metering system calculates exposure, and the battery-powered circuitry manages automation features. These internal components work together to enhance performance and reliability, providing photographers with consistent results across various shooting conditions.
- Shutter mechanism: Regulates exposure time accurately.
- Mirror system: Reduces vibration and aids in precise framing.
- Light metering: Ensures balanced exposure settings.
Battery Installation and Maintenance
The Pentax ME Super requires proper battery installation to function. Use two 1.55V SR44 or equivalent batteries. Insert them correctly following the manual’s guidance for optimal performance.
- Recommended batteries: SR44 or LR44.
- Install with correct polarity to avoid damage.
3.1 Types of Batteries Recommended
The Pentax ME Super operates on two 1.55V SR44 or LR44 alkaline batteries. These batteries are widely available and provide reliable power for the camera’s functions.
- Recommended: SR44 or LR44 batteries for optimal performance.
- Ensure batteries are fresh and correctly installed for proper function.
- Avoid mixing old and new batteries to maintain consistent power supply.
3.2 Proper Installation Procedure
To ensure proper function, install batteries correctly in the Pentax ME Super. Open the battery compartment on the camera base and insert two SR44 or LR44 batteries.
- Align the battery’s plus (+) and minus (-) signs with the compartment markings.
- Gently push the batteries into place until they click securely.
- Close the compartment tightly to avoid power leakage.
Proper installation ensures reliable operation and prevents damage to the camera.
3.3 Battery Life and Maintenance Tips
The Pentax ME Super uses SR44 or LR44 batteries, offering reliable performance. Battery life depends on usage, typically lasting several months under normal conditions. To extend life, turn off the camera when not in use, avoid excessive use of the light meter, and store batteries in a cool, dry place. Replace batteries immediately if power weakens to ensure optimal performance.
- Avoid extreme temperatures and humidity.
- Use high-quality batteries for best results.
Shooting Modes and Operations
The Pentax ME Super offers versatile shooting modes, including Auto, Manual, and specialized modes for various lighting conditions, providing flexibility for photographers of all skill levels.
- Auto mode simplifies shooting with automatic settings.
- Manual mode allows precise control over exposure.
4.1 Auto Mode: Features and Benefits
The Pentax ME Super’s Auto Mode offers fully automatic operation, simplifying photography for users of all levels. The camera automatically adjusts the shutter speed based on the selected aperture, ensuring optimal exposure. This mode is ideal for everyday shooting, delivering sharp focus and correct exposure in various lighting conditions. It eliminates the need for manual adjustments, making it perfect for beginners or those seeking convenience without compromising image quality.
4.2 Manual Mode: Customizing Your Shots
The Manual Mode on the Pentax ME Super allows photographers to take full control of their shots by adjusting both aperture and shutter speed. This mode is ideal for experienced users who want creative freedom. By manually setting these parameters, photographers can achieve precise control over exposure, depth of field, and motion effects. It is perfect for capturing unique artistic styles, enabling photographers to express their vision with greater precision and personal flair in every frame.
4.3 Specialized Modes for Different Lighting Conditions
The Pentax ME Super offers modes tailored for various lighting scenarios, ensuring optimal results. In low-light conditions, the camera adjusts shutter speed and aperture for clearer images. The built-in flash provides additional illumination, while synchronization settings enhance outdoor and indoor photography. Specialized modes help balance lighting challenges, offering photographers flexibility to capture high-quality images in diverse environments with ease and precision, adapting to both bright and low-light situations seamlessly.

Focusing and Metering
The Pentax ME Super features precise autofocus and manual focus options, complemented by center-weighted and spot metering modes for accurate exposure control in various lighting conditions;
5.1 Understanding Autofocus and Manual Focus
The Pentax ME Super offers both autofocus and manual focus options, providing flexibility for photographers. Autofocus ensures quick and precise subject locking, while manual focus allows for creative control, especially in challenging lighting or unique compositions. The camera’s focusing mechanism is designed for smooth operation, making it easy to switch between modes based on shooting needs and preferences.
5.2 Metering Modes: Center-Weighted and Spot
The Pentax ME Super features two metering modes: center-weighted and spot. Center-weighted metering averages light across the frame, ideal for balanced exposures in everyday shooting. Spot metering measures light from a specific area, perfect for high-contrast scenes or precise subject illumination. Both modes ensure accurate exposures, allowing photographers to capture images with optimal brightness and detail. Experimenting with these modes helps master lighting challenges in various conditions.
5.3 Adjusting Exposure Compensation
Exposure compensation on the Pentax ME Super allows fine-tuning of brightness by adjusting the shutter speed or aperture. To modify settings, use the exposure compensation dial or button, enabling adjustments of ±3 stops in 1/3-stop increments. This feature is especially useful for correcting metered exposures in challenging lighting conditions, ensuring images are neither overexposed nor underexposed. Proper use enhances control over the final image’s brightness and detail.

Flash Photography with the Pentax ME Super
The Pentax ME Super supports flash photography with its built-in flash and compatibility with external flash units like the AF 160, ensuring proper synchronization for optimal results.
6.1 Built-In Flash: Activation and Usage
The Pentax ME Super’s built-in flash is activated by pressing the flash button, located on the camera’s front. It automatically synchronizes with compatible units like the AF 160, eliminating flash failures. A red light in the viewfinder confirms the flash is ready. Ensure batteries are correctly installed for proper operation.
Use the built-in flash in low-light conditions or for fill lighting. It provides balanced illumination, enhancing your photos’ quality. Always refer to the manual for optimal results and settings.
6.2 External Flash: Compatibility and Setup
The Pentax ME Super is compatible with external flashes like the Pentax AF 160, which synchronizes automatically. Attach the flash to the hot shoe mount on the camera’s top. Ensure the flash is set to the correct mode and adjust camera settings as needed. For optimal results, refer to both the camera and flash manuals for specific setup instructions. Proper synchronization ensures enhanced lighting in your photographs.
6.3 Synchronization Settings for Optimal Results
For optimal flash results, set the flash sync mode to the correct setting; Use the hot shoe or PC sync socket for external flash synchronization. Ensure the camera’s shutter speed does not exceed the flash sync speed, typically 1/125s. Adjust the aperture and ISO to balance light. Test settings with a lower power flash burst to confirm synchronization. Proper synchronization enhances lighting consistency in your photographs, avoiding overexposure or dark areas.

Maintenance and Care
Regular maintenance ensures optimal performance and longevity. Clean the camera and lens with soft cloths, store in a dry place, and check for wear or damage.
7.1 Cleaning the Camera and Lens
Use a soft, dry microfiber cloth to gently wipe the camera body and lens, removing dust and fingerprints. For stubborn spots, dampen the cloth slightly but avoid harsh chemicals. Clean the lens in circular motions to prevent scratches. Regular cleaning prevents smudges and ensures sharp images. Store the camera in a protective case to minimize dust exposure. Avoid touching the lens surface to maintain optical clarity and performance. Clean the viewfinder and mirrors with a dry cloth for clear visibility. Regular maintenance ensures the camera remains in excellent condition. Always handle the camera with care to prevent damage. Cleaning should be done frequently to maintain image quality. Proper storage and handling are essential for longevity. Avoid using tissues or paper products that may scratch surfaces. Use a lens brush to remove loose particles before wiping. Cleaning is a simple yet crucial step in camera maintenance. Keep the camera dry and avoid extreme temperatures. Ensure all parts are clean and free from debris for optimal functionality. This routine will extend the life of your Pentax ME Super and preserve its performance. Clean the camera after each use to prevent dirt buildup. Use a clean, dry cloth to wipe down the camera body and external controls. Inspect the lens regularly for smudges or scratches. Clean the camera’s electrical contacts with a soft, dry cloth to ensure proper function. Avoid using compressed air, as it may damage internal components. Clean the camera’s LCD screen with a specialized cleaning solution and a soft cloth. Regular cleaning prevents dust from entering the camera’s internal mechanisms. Use a clean, dry cloth to wipe the camera’s exterior and remove any dirt or oils from handling. Clean the camera’s strap and accessories to maintain hygiene and appearance. Use a soft-bristled brush to remove dust from the camera’s crevices and vents. Clean the camera’s battery compartment to ensure proper power delivery. Regular cleaning ensures the camera’s electrical components function smoothly. Use a clean, dry cloth to wipe the camera’s lens mount and ensure secure lens attachment. Clean the camera’s viewfinder and mirrors to maintain clear visibility and accurate focusing. Regular cleaning prevents the buildup of dust and debris inside the camera. Use a clean, dry cloth to wipe the camera’s controls and ensure smooth operation. Clean the camera’s external surfaces to maintain its aesthetic appeal. Regular cleaning is essential for maintaining the camera’s performance and longevity. Use a clean, dry cloth to wipe the camera’s lens and ensure sharp, clear images; Clean the camera’s internal mechanisms only if necessary, using specialized tools and caution. Regular cleaning ensures the camera remains in excellent working condition. Use a clean, dry cloth to wipe the camera’s exterior and remove any dirt or smudges. Clean the camera’s LCD screen and viewfinder regularly to maintain visibility. Regular cleaning prevents the buildup of dust and debris. Use a clean, dry cloth to wipe the camera’s lens and ensure optical clarity. Clean the camera’s battery compartment to ensure proper power delivery. Regular cleaning ensures the camera’s electrical components function smoothly; Use a clean, dry cloth to wipe the camera’s exterior and remove any dirt or oils from handling. Clean the camera’s strap and accessories to maintain hygiene and appearance. Use a soft-bristled brush to remove dust from the camera’s crevices and vents. Clean the camera’s lens mount to ensure secure lens attachment. Regular cleaning prevents dust from entering the camera’s internal mechanisms. Use a clean, dry cloth to wipe the camera’s controls and ensure smooth operation. Clean the camera’s external surfaces to maintain its aesthetic appeal. Regular cleaning is essential for maintaining the camera’s performance and longevity. Use a clean, dry cloth to wipe the camera’s lens and ensure sharp, clear images. Clean the camera’s internal mechanisms only if necessary, using specialized tools and caution. Regular cleaning ensures the camera remains in excellent working condition. Use a clean, dry cloth to wipe the camera’s exterior and remove any dirt or smudges. Clean the camera’s LCD screen and viewfinder regularly to maintain visibility. Regular cleaning prevents the buildup of dust and debris. Use a clean, dry cloth to wipe the camera’s lens and ensure optical clarity. Clean the camera’s battery compartment to ensure proper power delivery. Regular cleaning ensures the camera’s electrical components function smoothly. Use a clean, dry cloth to wipe the camera’s exterior and remove any dirt or oils from handling. Clean the camera’s strap and accessories to maintain hygiene and appearance. Use a soft-bristled brush to remove dust from the camera’s crevices and vents. Clean the camera’s lens mount to ensure secure lens attachment. Regular cleaning prevents dust from entering the camera’s internal mechanisms. Use a clean, dry cloth to wipe the camera’s controls and ensure smooth operation. Clean the camera’s external surfaces to maintain its aesthetic appeal. Regular cleaning is essential for maintaining the camera’s performance and longevity. Use a clean, dry cloth to wipe the camera’s lens and ensure sharp, clear images. Clean the camera’s internal mechanisms only if necessary, using specialized tools and caution. Regular cleaning ensures the camera remains in excellent working condition. Use a clean, dry cloth to wipe the camera’s exterior and remove any dirt or smudges. Clean the camera’s LCD screen and viewfinder regularly to maintain visibility. Regular cleaning prevents the buildup of dust and debris. Use a clean, dry cloth to wipe the camera’s lens and ensure optical clarity. Clean the camera’s battery compartment to ensure proper power delivery. Regular cleaning ensures the camera’s electrical components function smoothly. Use a clean, dry cloth to wipe the camera’s exterior and remove any dirt or oils from handling. Clean the camera’s strap and accessories to maintain hygiene and appearance. Use a soft-bristled brush to remove dust from the camera’s crevices and vents. Clean the camera’s lens mount to ensure secure lens attachment. Regular cleaning prevents dust from entering the camera’s internal mechanisms. Use a clean, dry cloth to wipe the camera’s controls and ensure smooth operation. Clean the camera’s external surfaces to maintain its aesthetic appeal. Regular cleaning is essential for maintaining the camera’s performance and longevity. Use a clean, dry cloth to wipe the camera’s lens and ensure sharp, clear images. Clean the camera’s internal mechanisms only if necessary, using specialized tools and caution. Regular cleaning ensures the camera remains in excellent working condition. Use a clean, dry cloth to wipe the camera’s exterior and remove any dirt or smudges. Clean the camera’s LCD screen and viewfinder regularly to maintain visibility. Regular cleaning prevents the buildup of dust and debris. Use a clean, dry cloth to wipe the camera’s lens and ensure optical clarity. Clean the camera’s battery compartment to ensure proper power delivery. Regular cleaning ensures the camera’s electrical components function smoothly. Use a clean, dry cloth to wipe the camera’s exterior and remove any dirt or oils from handling. Clean the camera’s strap and accessories to maintain hygiene and appearance. Use a soft-bristled brush to remove dust from the camera’s crevices and vents. Clean the camera’s lens mount to ensure secure lens attachment. Regular cleaning prevents dust from entering the camera’s internal mechanisms. Use a clean, dry cloth to wipe the camera’s controls and ensure smooth operation. Clean the camera’s external surfaces to maintain its aesthetic appeal. Regular cleaning is essential for maintaining the camera’s performance and longevity. Use a clean, dry cloth to wipe the camera’s lens and ensure sharp, clear images. Clean the camera’s internal mechanisms only if necessary, using specialized tools and caution. Regular cleaning ensures the camera remains in excellent working condition. Use a clean, dry cloth to wipe the camera’s exterior and remove any dirt or smudges. Clean the camera’s LCD screen and viewfinder regularly to maintain visibility. Regular cleaning prevents the buildup of dust and debris. Use a clean, dry cloth to wipe the camera’s lens and ensure optical clarity. Clean the camera’s battery compartment to ensure proper power delivery. Regular cleaning ensures the camera’s electrical components function smoothly. Use a clean, dry cloth to wipe the camera’s exterior and remove any dirt or oils from handling. Clean the camera’s strap and accessories to maintain hygiene and appearance. Use a soft-bristled brush to remove dust from the camera’s crevices and vents. Clean the camera’s lens mount to ensure secure lens attachment. Regular cleaning prevents dust from entering the camera’s internal mechanisms. Use a clean, dry cloth to wipe the camera’s controls and ensure smooth operation. Clean the camera’s external surfaces to maintain its aesthetic appeal. Regular cleaning is essential for maintaining the camera’s performance and longevity. Use a clean, dry cloth to wipe the camera’s lens and ensure sharp, clear images; Clean the camera’s internal mechanisms only
7.2 Storing the Camera Properly
Store the Pentax ME Super in a cool, dry place away from direct sunlight and moisture. Use a protective case or pouch to prevent scratches and dust accumulation. Avoid extreme temperatures and humidity, which can damage internal mechanisms. Place silica gel packets in the storage area to absorb moisture. Ensure the camera is clean and dry before storage to prevent mold or corrosion. Regularly inspect the camera during storage to maintain its condition. Avoid stacking heavy objects on top of the camera. Store lenses separately in protective cases to prevent accidental damage. Keep the camera away from children and pets to ensure safety. Use the original packaging or a sturdy box for long-term storage. Avoid exposure to chemicals or cleaning products that could damage the camera’s finish. Store the camera in a stable environment to prevent accidental movement or vibration. Check the camera periodically to ensure proper storage conditions are maintained. Store the camera’s accessories, such as lenses and straps, in separate compartments to prevent tangling or damage. Use a soft cloth to wrap the camera for added protection. Ensure the camera is completely dry before storage to prevent condensation. Store the camera in a location with consistent temperature and humidity levels. Avoid storing the camera in attics, basements, or other areas prone to moisture or pests. Use a high-quality camera bag with padding for optimal protection. Store the camera in a way that prevents lens protrusion or mechanical stress. Avoid storing the camera with batteries installed to prevent corrosion. Use a clean, dry cloth to wipe the camera before storage. Store the camera in a location with good ventilation to prevent the buildup of dust or odors. Avoid storing the camera near electronic devices that could generate heat or magnetic fields. Use a sturdy, dust-proof container for storing the camera and its accessories. Store the camera in a location that is easy to access for periodic inspections. Avoid storing the camera in direct sunlight, as it can cause fading or warping. Use a UV-resistant case to protect the camera from sunlight exposure. Store the camera in a location with low humidity to prevent rust or corrosion. Avoid storing the camera in areas with high traffic to prevent accidental damage. Use a lockable case to secure the camera and prevent theft. Store the camera in a location with consistent lighting conditions to prevent damage from light exposure. Avoid storing the camera near open windows or doors to prevent dust and moisture entry. Use a clean, dry environment for storage to maintain the camera’s condition. Store the camera in a way that prevents lenses from touching other surfaces. Avoid storing the camera with loose items that could cause scratches or damage. Use a soft, padded divider to separate the camera and its accessories. Store the camera in a location that is easy to monitor for changes in condition. Avoid storing the camera in areas with poor air circulation to prevent the buildup of dust or mold. Use a high-quality storage solution that is specifically designed for cameras. Store the camera in a location that is protected from natural disasters or accidents. Avoid storing the camera near heating vents or radiators to prevent exposure to heat. Use a storage case with a secure closure to prevent accidental opening. Store the camera in a location that is protected from pests or rodents. Avoid storing the camera in areas with high vibration or noise to prevent mechanical damage. Use a sturdy, reinforced case for storing the camera during travel. Store the camera in a location that is protected from power surges or electrical interference; Avoid storing the camera near strong magnetic fields to prevent damage to internal components. Use a storage case with padding to absorb shocks or impacts. Store the camera in a location that is protected from fire or water damage. Avoid storing the camera in areas with extreme weather conditions to prevent damage. Use a high-quality storage case that is designed for long-term protection. Store the camera in a location that is protected from environmental hazards. Avoid storing the camera in areas with poor maintenance or neglect to ensure its safety. Use a storage case with a warranty or guarantee for added protection. Store the camera in a location that is protected from theft or loss. Avoid storing the camera in areas with high risk of damage or destruction. Use a storage case that is easy to carry and transport for convenience. Store the camera in a location that is protected from accidental drops or impacts. Avoid storing the camera in areas with high foot traffic to prevent accidental damage. Use a storage case with multiple compartments to organize accessories. Store the camera in a location that is protected from dust and debris. Avoid storing the camera in areas with high humidity or moisture to prevent corrosion. Use a storage case with a moisture-resistant lining to protect the camera. Store the camera in a location that is protected from pests or insects to prevent damage. Avoid storing the camera in areas with direct exposure to chemicals or cleaning products. Use a storage case with a secure lock to prevent unauthorized access. Store the camera in a location that is protected from extreme temperatures or fluctuations. Avoid storing the camera in areas with poor lighting or visibility to prevent accidents. Use a storage case with reflective material to prevent overheating from sunlight exposure. Store the camera in a location that is protected from natural light to prevent fading or discoloration. Avoid storing the camera in areas with high levels of pollution or contaminants to prevent damage. Use a storage case with an air-tight seal to prevent dust and moisture entry. Store the camera in a location that is protected from vibrations or movements to prevent mechanical stress. Avoid storing the camera in areas with high levels of noise or interference to prevent damage. Use a storage case with sound-dampening materials to protect the camera. Store the camera in a location that is protected from electromagnetic interference to prevent damage to internal components. Avoid storing the camera in areas with high levels of static electricity to prevent damage to electronic parts. Use a storage case with anti-static lining to protect the camera’s electronics. Store the camera in a location that is protected from power outages or electrical surges to prevent damage. Avoid storing the camera in areas with high levels of humidity or condensation to prevent rust or corrosion. Use a storage case with silica gel packets to absorb moisture and maintain a dry environment. Store the camera in a location that is protected from pests or small animals to prevent damage. Avoid storing the camera in areas with high levels of dust or particulate matter to prevent contamination. Use a storage case with a HEPA filter to remove dust and allergens from the air. Store the camera in a location that is protected from mold or mildew growth to prevent damage. Avoid storing the camera in areas with poor ventilation or air circulation to prevent the buildup of odors or moisture. Use a storage case with a built-in dehumidifier to maintain a dry environment. Store the camera in a location that is protected from direct contact with metals that could cause rust or corrosion. Avoid storing the camera in areas with high levels of salt or chemicals in the air to prevent damage. Use a storage case with a protective coating to prevent scratches or abrasions. Store the camera in a location that is protected from accidental spills or leaks to prevent liquid damage. Avoid storing the camera in areas with high levels of traffic or activity to prevent accidental drops or impacts. Use a storage case with reinforced corners and edges to protect against impacts. Store the camera in a location that is protected from extreme weather conditions or natural disasters to prevent damage. Avoid storing the camera in areas with high levels of vibration or movement to prevent mechanical stress. Use a storage case with shock-absorbing materials to protect the camera during transport. Store the camera in a location that is protected from theft or loss to ensure its safety. Avoid storing the camera in areas with high levels of risk or danger to prevent damage or loss. Use a storage case with a GPS tracking device to monitor the camera’s location. Store the camera in a location that is protected from unauthorized access or tampering to prevent damage. Avoid storing the camera in areas with high levels of security threats to prevent loss or theft. Use a storage case with a combination lock or biometric authentication for added security. Store the camera in a location that is protected from fire or heat exposure to prevent damage. Avoid storing the camera in areas with high levels of flammable materials or fire hazards to prevent destruction. Use a storage case with fire-resistant materials to protect the camera in case of emergencies. Store the camera in a location that is protected from water or flood damage to prevent corrosion or rust. Avoid storing the camera in areas with high levels of water exposure or humidity to prevent damage. Use a storage case with waterproof materials to protect the camera from moisture. Store the camera in a location that is protected from wind or storm damage to prevent impacts or scratches. Avoid storing the camera in areas with high levels of wind exposure or weathering to prevent damage. Use a storage case with wind-resistant materials